Steps to Planting a Tree
Written by Mayra Rodríguez González, PhD
For questions, email mayra.rodriguez_gonzalez@uconn.edu
1. Start with the site, not the tree
A tree may look healthy in the nursery but still fail if the planting site is too small, poorly drained, or heavily compacted. Urban soils often have low oxygen levels, restricted rooting space, and altered soil chemistry. These conditions make it harder for roots to grow and take up water. The best tree for a location is the one that fits the site conditions. Before planting, evaluate:
- Soil drainage
- Soil compaction
- Soil volume
- Available sunlight
- Space for root and canopy growth
- Exposure to salt, wind, drought, or flooding
- Possible conflicts with buildings, sidewalks, wires, and pavement
2. Choose the right tree for the right place
Species selection is one of the most important decisions in tree planting. Trees differ in their tolerance to drought, wet soils, compaction, road salt, heat, and pests. A species that thrives in one setting may struggle in another. When selecting a tree, consider:
- Mature height and spread
- Rooting space needed
- Tolerance to heat, drought, or flooding
- Resistance to common pests and diseases
- Structural strength and branching pattern
- Maintenance needs over time
- What trees are already present (Planting too many trees from the same species or genus increases risk if a pest, disease, or severe weather event affects that group.)
- Broader community goals
(Note: Tree selection resources are provided in the resource list located immediately after this planting guide. Some notable resources listed include a hardiness zone web map, as well as available and recommended tree lists for Connecticut.)
3. Select high-quality nursery stock
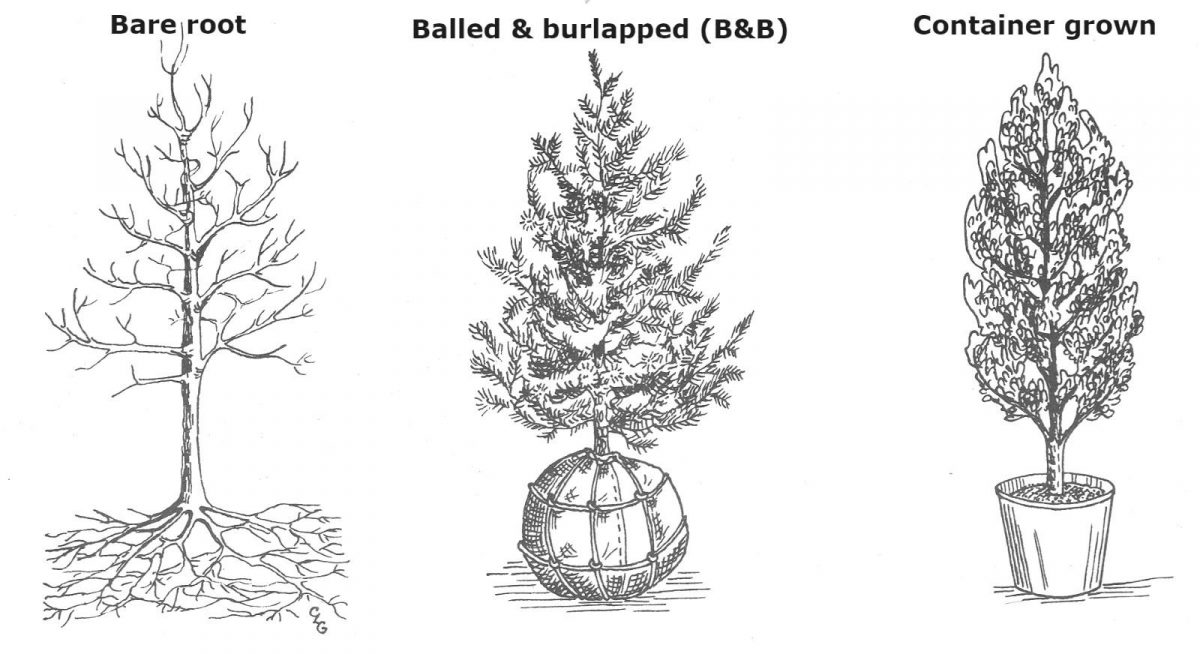
Nursery stock type affects root quality, transplant shock, and establishment success. Trees are commonly sold as:
- Container-grown and Containerized: Container-grown trees have spent their entire life in a container, meaning their root system remains completely intact. Meanwhile, containerized trees are field-grown, then dug up and placed into a container for sale. While both types are widely available and easy to transport, they are prone to developing circling or girdling roots if they remain in the container for too long.
- Balled and Burlapped (B&B): These trees are grown directly in the field and dug up with a ball of soil intact around their roots, which is then wrapped in burlap. B&B trees generally boast a robust, field-grown root structure; however, they still lose a substantial portion of their root system during the digging and shipping process.
- Bare-root: These trees are dug from the field while dormant, and all soil is removed from the roots. They are incredibly lightweight, cost-effective, and possess 100% of their root system. However, they have a very narrow planting window and must be planted quickly before the roots dry out.
(Note: When inspecting nursery stock, look for, a strong central leader, no obvious stem wounds or decay, roots that are not circling tightly around the container, a visible root flare, no deep planting in the container, and healthy foliage and buds appropriate for the season. Avoid trees that are planted too deeply in the pot, have major root deformation, have multiple competing leaders if that is not appropriate for the species, or show poor structure or mechanical injury.)
4. Prepare the root system before planting
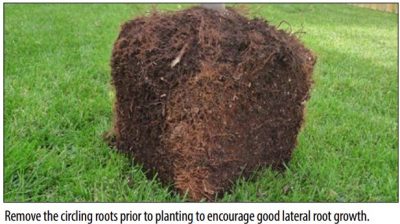
Root defects can cause long-term instability if they are not corrected at planting. For container-grown and containerized trees, circling roots or spiraling roots may later girdle the trunk or reduce anchorage. Before planting:
- Remove the container completely
- Inspect the outer roots
- Correct circling or girdling roots where possible (Simply dropping the root ball into a hole without fixing this can lock in root problems that remain hidden for years.)
- Tease apart minor root defects
- Prune severely damaged roots if needed
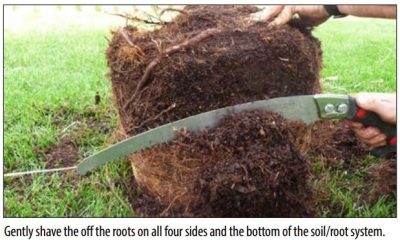
(Note: Box cutting is a highly effective planting method that prevents lethal girdling by squaring off a round, pot-bound root ball to eliminate tightly circling roots. To perform this technique, use a sharp saw to shave off approximately 1 inch of soil and tangled roots from all four vertical sides and the bottom of the root ball, transforming the round shape into a clean-cut square. This deliberate pruning stimulates the tree to immediately grow a healthy, outward-reaching root system once it is placed in the ground.)
For balled and burlapped trees, follow the recommendations below as failure to remove the materials listed can interfere with root growth and contribute to long-term instability.
- Remove all twine or rope
- Remove or fold back burlap from the upper portion of the root ball
- Remove the top portion of wire baskets when present
- Do not leave burlap or wire in place where it may restrict root expansion
5. Find the root flare on your tree
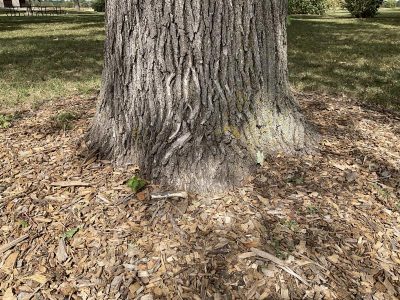
One of the most common planting mistakes is planting too deeply. The root flare is the point where the trunk widens near the base and transitions into the main structural roots. This flare should be visible at the soil surface or slightly above it after planting. Trees planted too deeply may develop poor oxygen exchange at the root collar, slower root growth, and higher risk of instability over time. Therefore, before digging, locate the root flare.
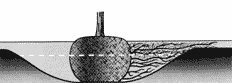
6. Dig a wide, shallow planting hole (ideally, saucer shaped) and plant your tree
A planting hole should be wider than the root ball (the main mass of roots and the surrounding soil directly beneath a plant), but not significantly deeper. Wide holes (especially saucer shaped) encourage outward root growth into surrounding soil. Deep holes can cause settling and planting too low. Best practices are as follows:
- Dig the hole 2 to 3 times wider than the root ball
- Make the hole no deeper than the height of the root ball, and remember that your root flare should be visible from aboveground once the tree is planted
- Loosen compacted soil around the planting area when possible
- When moving the tree to plant it, always lift and move it by the root ball, never by the trunk or branches as this can damage the tree
- When the hole is ready, place the tree so the root flare is at or slightly above the surrounding soil grade
- Do not bury the trunk
- Do not cover the root flare with mulch or soil
If the surrounding soil is very compacted, improving a broader planting area may help more than simply amending the soil in the hole. Roots need access to surrounding soil, not just a pocket of loose mix. Where possible, planting space should also account for the tree’s mature size in three dimensions:
- Aboveground: Mature height and crown spread
- Belowground: Root expansion and anchorage
- Lateral space: Proximity to buildings, pavement, and other trees
7. Backfill with native soil
In most situations, the best backfill is the soil that came out of the hole. When backfilling, you should: break up large clods, remove rocks and debris, and water the soil in as you backfill to reduce air pockets.
Excessive amendments can create a textural mismatch between the backfill and the surrounding soil, which may slow root expansion. Routine fertilizer at planting is usually not necessary. A newly planted tree benefits more from proper depth, correct watering, and mulch than from extra fertilizer.
Soil pH also matters. Many Connecticut forest trees prefer slightly acidic soils, generally in the range of pH 5.5 to 6.5. Soil pH affects nutrient availability and the activity of beneficial soil organisms. Where conditions are uncertain, soil testing can help identify pH concerns and guide management before planting. To learn more about soil in your area or identify resources for soil testing services, please consult the resource list provided immediately after this planting guide.
8. Mulch correctly
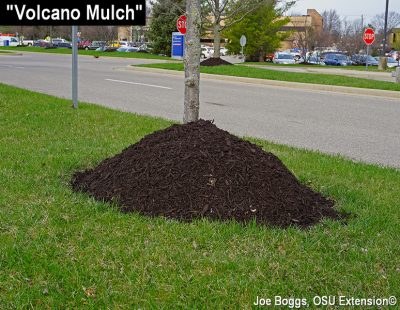
Mulch helps conserve moisture, moderate soil temperature, reduce weeds, and improve soil structure over time. But mulch must be applied correctly. Mulch volcanoes can trap moisture against the trunk, promote decay, and encourage shallow rooting. A wide, flat mulch ring is much better than a mound against the stem. The following guidelines should help you mulch correctly:
- Apply 2 to 4 inches of organic mulch
- Keep mulch away from the trunk
- Do not pile mulch against the stem
- Maintain a mulch ring over the root zone
9. Water consistently during establishment
Water is the most important post-planting care practice. Newly planted trees do not yet have an extensive root system, so they need regular irrigation during establishment. A general guideline is approximately 5 to 10 gallons of water per inch of trunk diameter per watering event, although larger trees or drought-prone sites may require more. Watering needs vary according to tree size, soil texture, drainage, weather, and species.
It is better to water less frequently but slowly and deeply, than watering frequently and shallowly. Always check soil moisture before watering again, and adjust frequency for soil texture and drainage. Both underwatering and overwatering can damage trees. Saturated soils reduce oxygen availability to roots, while dry soils reduce root growth and increase transplant stress.
10. Stake only when needed, and remove stakes promptly
Trees do not always need staking. In many cases, trees establish better when allowed to move naturally in the wind. Staking should be used only when needed for stability, protection, or site conditions. Stake trees only if the tree cannot stand upright on its own, the site is very windy, or if the tree is at risk of being damaged by people, animals or equipment.
If staking is used, use flexible ties, do not tie the tree tightly (i.e., allow some trunk movement), and remove stakes as soon as the tree can stand independently. Leaving stakes on too long can weaken trunk development, create rubbing damage, and reduce natural stability.
11. Prune for structure early
Early structural pruning helps trees develop a strong framework. Corrective pruning at planting or shortly after planting can reduce the chance of future problems. Good pruning can help:
- Maintain a dominant central leader when appropriate
- Remove broken, dead, or rubbing branches
- Reduce codominant stems if they present a structural risk
- Avoid unnecessary removal of healthy foliage
12. Protect the tree after planting
The establishment period often lasts several years. During this time, the tree is especially vulnerable to drought, mowers, string trimmers, animals, and construction. Newly planted trees may also need protection from deer, rodents, and other wildlife. Tree shelters, trunk guards, or fencing may be appropriate in areas with frequent browsing or mechanical damage. A young tree may appear small and flexible, but the root system is still developing and can be easily damaged by disturbance. Some practices to protect a tree after planting include:
- Keep turf and weeds away from the trunk
- Use mulch to reduce competition
- Protect the trunk from mechanical injury
- Avoid soil compaction near the root zone
- Do not excavate or trench close to the tree